Our social:

Latest Post

Saturday, 12 March 2016

Adding Media Whilst Creating a New Post


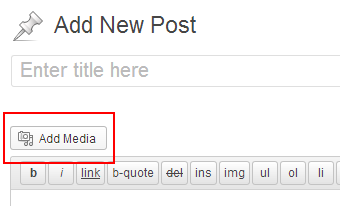
In most instances, you’ll be adding media files as you are creating a new post. In the left-hand menu of your Dashboard, click Add New under Posts. Start writing your new blog post, and as you are ready to embed a media file, place the cursor in the area of the post where you want the image or video to appear. Click the Add Media button, located below the post title and above the controls panel, also known as the “Kitchen Sink.”

Adding Media From Your Device

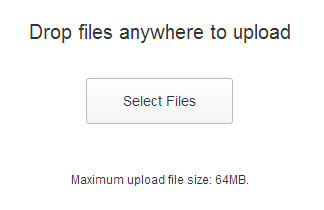
Once the media uploader popup opens, select the Upload Files tab. Click Select Files to upload the files no larger than 20 MB from your computer. The complete list of allowed formats can be found here.
Once the file is uploaded, it will show up in your Media Library. On the right-hand side you’ll see attachment details. You should edit some of these fields, including title – make sure it has no spaces in it, otherwise it will not look good inside the URL. Simply replace the spaces with dashes. You’ll need to pay particular attention to the Alt text, which should be a brief description of the file that serves as an important parameter for search engines. Placing a keyword or two in the Alt text is always a good idea. Caption and Description are optional fields. You can also choose the alignment position of the file in the text, and link it to something or just leave this option at None. The size of the file can also be adjusted. Check Insert into Post when you are ready to embed your media file.

Adding Media From a URL

Besides uploading the files from your device, you can also add them to your post by entering a link to a media file. From the uploader popup, simply click Insert from URL. Once the file is uploaded, scroll down to find the same attachment options you saw when uploading the file from your computer.

Adding Media through the Dashboard

From your Dashboard, you can upload files to the Media Library to be used in various posts later. To do this, click Media in the left-hand menu of the Dashboard, followed by Add New. Here you will see a multi-media uploader, which looks slightly different from the single-file uploader you used before. Once your file is uploaded, click the Edit button next to it and scroll down to the bottom of the screen to find the attachment options. Click Update once you are done filling out the info. Your file will now show up in your Media Library. It will be marked as “Unattached,” since it’s not part of a post yet, but you can add it to any post later.

Using Files from the Media Library

You can access your media library anytime either from your Dashboard or from an individual post. Click Media from your Dashboard to view and edit any files you have uploaded. If you want to add a file from the Media Library to a post, open the Add New Post screen and click Add Media. Go to the Media Library tab, where you’ll find the files you have previously uploaded. Once you select an individual file, you’ll see the attachment editing options to the right. Make any necessary changes and click Insert into Post.

Different File Types

WordPress media uploader works the same way no matter what type of file you choose to embed. The only difference you will notice is that when uploading audio and video files, you’ll get an additional option to Embed Media Player in the attachment options. This will allow you to display your media file as a player rather than having it lead to an external link or show up as an attachment to the blog post.

Adding Images to Your WordPress Blog or Website

A picture is worth more than 1,000 words when presented within a blog post (or page). On the web, an image could break up text, which can part the sea of text making it all more readable. An image can also help illustrate a point, and provide SEO value.
An image could find its way into image search results on a search engine. It can also, with the inclusion of keywords in its meta tags, potentially help a post rank for more keywords. Not only that, the image can be auto-thumbnailed in search results and show up when shared in Facebook or other social sites.
A search engine result with an image will attract the eye more so than one without, in most cases.

Adding Images to WP Posts the Old School Way

I’m from the old school. When I add an image I, more often than not, edit the image to be the exact dimensions that I want to work with. I use free tools like Gimp. You can use Photoshop too (if you have it).
I then, using good old fashioned FTP, upload the image to the trusty “images” folder off the root.
I then hand code the image tag in “Text” view of my WordPress post/page edit screens.
The code might look like this:
<img style="float: right; margin: 0 0 5px 10px;" title="pictre of a bat" src="http://example.com/images/pic.jpg" alt="picture of a bat" width="187" height="94" border="0" />

Let’s break it down shall we:

src: this represents the path to the image. I always use the full domain here so the image shows proper in RSS feeds, etc. In only one case when working for someone else they asked that I use only /images/pic.jpg without the domain in case they link-spam the domain with their SEO and need to switch domains. Doing it this way would save them the extra work later. Doing things ethically would prevent this from being a concern, but I digress.
width/height: the dimensions to the image, I always make sure they are the “real” dimensions, not just ones to force the size of the image.
alt: this is meant to be a textual representation for the image for the visually impaired, bandwidth savers, text browser users, and search engines.
title: usually, depending on the web browser, this phrase will be shown when hovering over the image. It is supposed to provide SEO value too but I think it is overkill and overoptimization personally, so I usually leave it out.
border: out of habit I always include this, which is a value in pixels that determines the size of the border around the image. It used to be that, when linking an image, if you didn’t explicitly tell all browsers NOT to include a border, then it would add a bad looking blue border. So, I got in the habit of using it. I use CSS for borders when I really want them, so I guess I’m not thatold school.
style: it’s probably not best practice to include styles in this manner. It’s a bad habit I picked up. It is preferred to include styles within CSS sheets, and make reference to the style with a class name (or ID). WP does this elegantly when using the automated tools for including images which I will cover shortly.
The particular style I used in the above example pushes the image to the right and wraps text around it to the left. I specified that I do not want a margin at the top or right side (represented by the first two numbers), but that I wanted 5px on the bottom and 10px on the left to create some white space around the image so that it doesn’t touch the text. Why different amounts? I haven’t measured but it seems that there is always 5px below the image with margin space for some reason, so I just add 5 more and it always looks pretty even.

Image Sources

You have to be careful when using images on your site or blog. If they are either copyrighted or assumed copyrighted it is best to either a) not use them or b) get permission. And always cite the source of the image.
You could get images from stock photo sites (example: ShutterShock) that grant you rights to use them. morgueFile is another source, which offers a free photo archive. Be sure to read the terms.
You can always get your own images. Either download them from your digital camera or phone, or get some screenshots. There’s a free Chrome browser plugin by Google that makes it easy to take screenshots. Screenshots, at least, will provide you with unique images that you can probably use in your WordPress sites. Just be careful and always cite your sources. Get permission from the respective owner when not sure. Always show respect.

Inserting Images Into WordPress Posts or Pages

Using the Add Media within the add/edit post/page screens will give you access to the Media Library.
It will also allow you to upload images that will get auto-resized based on the set thumbnail values for the particular theme that you are working with.
You can set an image as “Featured” or insert it right within the post. When setting as Featured, the theme will have full control over placement and size, and the HTML that gets generated.
When “inserting into a post” you have a little more control. You can certainly decide where the image is placed, and you could choose from some set “classes” to decide on text wrapping, etc.
Step 1) Click the Add Media button.
add media button in wp post
Step 2) Click the Select Files button.
select files to upload screen
Step 3) Locate the image on your computer, and click Open.
You can see the progress meter in the image slot itself, plus in the right side in the Attachment Details window.
You can click the Edit Image text link for basic cropping, and image flipping options. You can choose to have the changes applied to all of the thumbnails that were created during the upload process.
Step 4) Give the image a Title, and preferably a Caption, and Alt Text as well, for some potential SEO value. Some themes, but not many, will incorporate the Description value somehow.
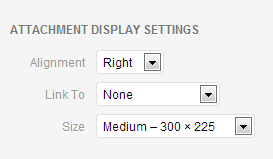
Step 5) Pick an alignment (center, left, right) or leave it as None.
Step 6) By default, the thumbnail image that gets inserted will link to the biggest version of itself (the originally uploaded file). That can be changed to link to an attachment page (some argue that will give the best chance at getting the image into Image search results, if it’s worthy of being there). You can also have a link to a custom URL, or nowhere at all.
Step 7) Finally, choose one of the pre-built sizes. Most often there will be a small square, and a couple sizes that are within aspect ratio of the original, and also a Full Size option. Medium is usually the default.
When using screenshots for tutorials such as this, Full Size should be used so there is no distortion.
media attachment display settings screen
Step 8) Click the Insert into post button.
You will be presented with code similar to the following:
wp-image-embedding-shortcode-example
The id’s and classes may be defined by the theme which will dictate how the image will ultimately look within the blog post (or page) on the site.
Some unique classes will be displayed specific to the image. They will include the image id number, 57 in the example above, which allows you to give the particular image a custom style that will not be used on other images.

Adding Featured Images Into WordPress Posts or Pages

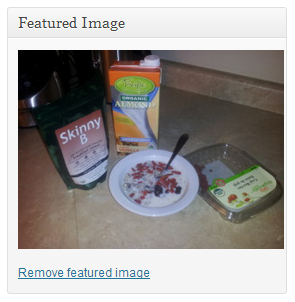
When adding a featured image, no HTML code will actually show up in the posts/pages content area. The theme will “check for” a featured image when the post is being shown and display it according to the theme’s style.
Step 1) Near the bottom of the right sidebar of the post/page add/edit screens you will see the Featured Image box. Click the Set featured imagetext link.
featured-image-example
Step 2) You will be presented with the Media Library by default where you can select an image and click the Set featured image button.
You can also click Upload Files near the top if the image isn’t already in the library.
You can then follow the Upload steps from above, minus the “Attachment Display Settings” instructions. Then click the Set featured image button.
featured-image-setting-example

Uploading Other Media Files to WP

You could upload other media files like videos and audio to be included within your posts, using the Media Library functions described above.
It is often recommended however, in many cases, to have the audio and video hosted elsewhere and just embedded into your site. WordPress plugins likeWP video lightbox can help you with that.
This saves on bandwidth and storage space, plus also allows you to take advantage of the in-built traffic, and the search engine love, that these media sharing sites have to offer.
YouTube and Vimeo are the top choices for video. And SoundCloud is the rising star for audio. As for images, some people will do a similar thing and upload to Flickr or Pinterest for example, then embed the content into their site.
I sometimes do that for general interest type of images (food for example), that have value on their own. Screenshots, in most cases, somehow don’t qualify.

How to Create WordPress blog posts and pages (Video Tutorial)

This post is aimed at the WordPress beginners who are looking for a tutorial on how to create a WordPress post with video instructions.

How to Create a post in WordPress

Creating a post in WordPress is really simple.
  • Login to the WordPress dashboard by visiting www.yourdomain.com/wp-admin
  • Click on ‘Add New’ from the ‘Posts’ menu once you are inside the WordPress admin panel
  • There are four main and important sections in a post that you should fill in before publishing the post
    • The post title
    • Post content
    • Tags
    • Categories
  • Give the post a nice title.
  • Add the post content in the content section.
  • Add relevant tags for this post.
  • Add the post to the relevant category (Create a category if a relevant category doesn’t exist).
  • Publish the post by hitting the ‘Publish’ button.

Few Post Editing How Tos

  • To add a more tag in the post just position the cursor at the appropriate place then click on the ‘Insert More Tag’
  • To create a header text just select the text then chose the desired Heading style
  • To insert bulleted list just click on the Ordered List button
  • To add the post to a Category just tick the desired category from the categories list
  • If a relevant category doesn’t exist then click on the ‘Add New Category’ and add it
  • To add relevant tags just type in the Tags in the Tags box
  • To save the post just click on ‘Save Draft’ anytime
  • To insert an image to the post, just click on the ‘Add an Image button
  • To add/embed YouTube video into your WordPress post simply copy the embed code from YouTube and paste it into your post in ‘HTML’ View. (It’s important that you paste the YouTube code in ‘HTML’ view and not the ‘Visual’ view)

Good Practice Tips

  • Save the post frequently (just in case something goes wrong and you lose power to your computer)
  • Always preview the post before publishing to make sure it looks exactly the way you want it to look.
  • Check spelling. (Reading an article full of spelling mistakes can be very annoying)
  • Do a proof reading and fix the grammatical errors if any.
  • Use the ‘All in all SEO’ WordPress plugin to optimize the post for search engines.

How to Create a post or page in WordPress (Video Tutorial)

In this video I have demonstrated:
  • How to create a post in WordPress.
  • How to create a page in WordPress.
  • How to insert an image to your post.
  • How to embed a YouTube video into your post.
If the video goes too fast for you then use the pause button to pause it.
If you have any question please leave it in the comment area below and I will try to answer it. Any suggestions are welcome.

WordPress System Integration 101

I see many WordPress users mixing up the roles of a WordPress plugin with a theme (kind of like mixing business with pleasure) on a regular basis without knowing what they are doing.  If you don’t know why WordPress invented the concept of plugins and themes, then this article is for you. —
Every time you build a WordPress site, you perform an act of System Integration.  You begin with the WordPress core, and customize it; by adding a theme and plugins.  But not everybody is a Systems Engineer; and in the process of constructing their sites, they sometimes make integration decisions that have costly consequences later on.
In WordPress, “a theme modifies the way a site is displayed, without modifying the underlying software.”  You select a theme based on the look and feel you want to (market or) present to your users.  Later, if you decide the look and feel of an existing site does not meet your (marketing) presentation requirements; you can simply choose another theme, without affecting the way a site functions.
Depending on your functional requirements, you might use one or more plugins “to extend the functionality of WordPress.”  You choose each plugin because it performs one or more specific tasks (such as payment processing) required of your completed site.  If you later decide the site needs to perform additional or different tasks; you can add or remove plugins without affecting the site’s look and feel.
Sometimes, for reasons of convenience and cost, it is tempting to select themes and plugins that overextend themselves; by crossing that well defined difference between a theme and plugin.  One example, is the use of “specialty themes” that bundle e-commerce functionality with look and feel.  When considering whether or not to use a specialty theme, be aware that you are also making a decision between vertically or horizontally integrating your system.
By de facto default, WordPress is a horizontally integrated system.  The theme you select and each of the plugins, has a specific role; the theme is in charge of look and feel, and each plugin performs specific independent tasks.  In this model, themes and plugins can be mixed and matched without much cost; in time, material and labor.
When using a specialty theme, you are making the decision to vertically integrate your system.  Vertical integration means that a single (theme or plugin) component is responsible for fulfilling the majority of a site’s operational (both presentation and functional) requirements.
Vertical integration is not necessarily a bad thing.  Systems built this way are tightly coupled and perform quite well.  The downside however, is that you’ve constructed a one off system, made from components that cannot be easily mixed and matched as your requirements change.
When you use a specialty theme to vertically integrate your WordPress site, you lose the flexibility of being able to easily mix & match, different themes and plugins.  If, at a later date, you outgrow the existing functionality of the specialty theme, or if your marketing (presentation) requirements change, it will be difficult and costly to implement changes; without an expensive site redesign.  Worse, is the prospect of having a site that is so tightly coupled; that only the original provider of the specialty theme can affect your desired changes.
The majority of WordPress themes and plugins are designed for use in horizontally integrated systems, because that is the de facto integration option for WordPress.  WordPress itself, is flexible enough to allow you to construct horizontal, vertical, or even hybrid (“L” shaped and silo) integrated systems.  However, if you deviate from the preferred horizontal integration philosophy, be prepared to either accept a one-off system or the prospect of difficult site redesigns; as your operational requirements change.
And if you are really in love with the features offered by a specialty theme, at least ask the provider about what kind of support you can expect, should you later decide to keep part of the specialty theme’s features while wanting to incorporate features offered by plugins or themes that are outside the vertical stack.

List of the Best and Must Use WordPress Plugins


This page has a list of some of the best WordPress Plugins out there. Check out this list of top WordPress plugins and find out which plugins you should be using to improve your blogging efficiency.

Must Use Plugins

  • Akismet – best guard against comment spam for WordPress blog!

Database and File Backup Plugins

  • BackUpWordPress – BackUpWordPress will back up your entire site including your database and all your files on a schedule that suits you.

Search Engine Optimization (SEO)

  • All in One SEO Pack – Out-of-the-box SEO for your WordPress blog. Install the all in one seo pack or the “WordPress SEO by Yoast” plugin (you don’t need to install both).
  • WordPress SEO by Yoast – Yoast’s all in one SEO solution for your WordPress blog: SEO titles, meta descriptions, XML sitemaps, breadcrumbs & much more.
  • Google XML Sitemaps – This plugin generates a XML-Sitemap compliant sitemap of your WordPress blog. This format is supported by Ask.com, Google, YAHOO and MSN Search. The SEO plugins listed above can also do the sitemap for you.

Blog Security Plugin

  • All In One WP Security & Firewall – The All In One WordPress Security and Firewall is the ultimate security plugin that will take your WordPress site’s security to a whole new level.
  • BulletProof Security – BulletProof security plugin offers website security protection against: XSS, RFI, CRLF, CSRF, Base64, Code Injection and SQL Injection.

Blog Statistics Related

  • Google Analytics for WordPress – This plugin makes it simple to add Google Analytics with extra search engines and automatic clickout and download tracking to your WordPress blog.
  • WordPress.com Stats – Tracks views, post/page views, referrers, and clicks. This plugin requires a WordPress.com API key to function.

Caching Plugin

  • W3 Total Cache – The fastest and most complete WordPress performance optimization plugin. After you use the w3 total cache plugin you won’t go back to using WP Super Cache.
  • WP Super Cache – WP Super Cache is a static caching plugin for WordPress. It generates html files that are served directly by Apache without processing comparatively heavy PHP scripts. By using this plugin you will speed up your WordPress blog significantly.

RSS Subscription Related

  • FeedBurner FeedSmith – This plugin detects all ways to access your original WordPress feeds and redirects them to your FeedBurner feed so you can track every possible subscriber.
  • Add to Any: Subscribe Button – Helps readers subscribe to your blog using any feed reader.
  • Category Specific RSS Menu – A simple WordPress plugin to add category specific RSS subscription menu into your posts, pages, sidebars. Very handy when your blog covers multiple topic from non related subjects. This plugin was developed by me.

Contact Forms Related

  • Contact Form 7 – Contact Form 7 can manage multiple contact forms, plus you can customize the form and the mail contents flexibly with simple markup. The form supports Ajax-powered submitting, CAPTCHA, Akismet spam filtering and so on.
  • cforms – cforms II is the most customizable, flexible & powerful ajax supporting contact form plugin.
  • WP Contact form – WP Contact Form is a drop in form for users to contact you.
  • Gravity Forms – Build and publish your WordPress forms in just minutes. No drudgery, just quick and easy form-building.

Social Networking

  • Sociable – Automatically add links to your favorite social bookmarking sites on your posts, pages and in your RSS feed.
  • Share This – This is a very useful plugin that allows your visitors to share a post/page with others. Supports e-mail and posting to social bookmarking sites.
  • Fat Free WordPress Social Share Buttons Plugin – This is a very simple and FAT FREE share button plugin that adds Google plus one, Facebook and Twitter share buttons to your blog posts.

For Google Adsense

  • Simple Google Adsense insertion – Easy to use WordPress plugin to insert Google Adsense to your posts, pages and sidebar.
  • Google Adsense Plugin – Google AdSense Plugin allows you to set parameters of the ads displaying, such as format (text ad, image, text with an image or link), size, color of the elements in the ad block, rounded corners and the ad block position on the website.
  • Google Adsense – The AdSense Plugin enables you to easily use Google’s products – including Webmaster Tools – with your WordPress site.

Photo Gallery Plugin

  • Simple Photo Gallery – If you are looking for an effective, reliable, yet simple to use photo gallery plugin, then check this gallery plugin out. I use it whenever I need a photo gallery plugin.
  • NextGen Gallery – The most popular WordPress gallery plugin and one of the most popular plugins of all time.

E-commerce, Paypal Donation and Payment

  • WordPress Simple Paypal Shopping Cart – is a very easy to use plugin that allows you to sell products or services online in one click from your WordPress blog. Very useful when you want to sell eBooks or digital products from various posts and pages and need a WordPress Shopping Cart solution.
  • WP Easy Paypal Payment Accept – This is a very easy to use WordPress plugin to Accept donation or Paypal payment for a service or a product in one click. Handy when you are trying to put a customized payment widget on your site (you can add it to the sidebar or a page or a post of your blog).
  • WordPress eStore – This plugin provides a complete solution to sell products from your site. It is really good for selling digital products securely from your WordPress blog.
  • WordPress Donations Widget Plugin – The WordPress Donations Widget Plugin allows you to collect donation for a cause from your WordPress powered site.
  • PayPal for Digital Goods – This plugin allows you to use the PayPal for Digital Goods gateway to accept payment for digital goods. Provides inline checkout of digital goods.

Membership Plugin

  • Simple Membership Plugin – The simple membership plugin lets you protect your posts and pages so only your members (free or paid) can view the protected content.
  • WordPress eMember – WP eMember is a feature rich membership plugin that can turn your existing or new WordPress site into a powerful membership site.

Affiliate Related

  • WP Affiliate Platform – WordPress plugin for affiliate recruitment, management and tracking. This plugin lets you run your own affiliate campaign/program and allows you to reward (pay commission) your affiliates for referred sales.
  • WordPress Affiliate Link Manager – Allows you to automatically convert specific keywords from your blog posts and pages into your affiliate links. It also cloaks the affiliate links and gives it a prettier and shorter alias (good for affiliate marketers).

Software License Management

  • Software License Manager – This plugin allows you to create a software license management solution for your web applications (WordPress plugins, Themes, PHP based membership script etc.)

Other Very Useful Plugins

  • Yet Another Related Posts Plugin –  This plugin gives you a list of posts and/or pages related to the current entry, introducing the reader to other relevant content on your site.
  • Download Monitor – This plugin is very useful for managing and tracking your digital file downloads. You can track which file is being downloaded how many times and who is downloading them.
  • Executable PHP Widget – Like the Text widget, but it will take PHP code as well. Very handy for inserting custom ‘php’, ‘html’, ‘javascript’ in the sidebar.
  • Crayon Syntax Highlighter – A plugin to highlight any code in your posts or pages. very handy if you use example codes in your Blog.
  • Mailpoet Newsletters – Send newsletters, post notifications or autoresponders from WordPress easily, and beautifully.
  • WP-Polls – Adds an AJAX poll system to your WordPress blog. Allows you to easily include a poll into your WordPress’s blog post/page.
  • EWWW Image Optimizer – The EWWW Image Optimizer is a WordPress plugin that will automatically and losslessly optimize your images as you upload them to your blog.
  • WP Video Lightbox – The WordPress Video Lightbox plugin allows you to embed videos on a page using lightbox overlay display. This plugin can be used to display images, flash, YouTube, Vimeo, iFrame etc in a nice lightbox overlay.
This page will be regularly updated to keep the plugin list up to date and relevant. Please suggest your favorite plugins through the comment area below so I can check them out and possibly add them to this useful plugins list.

WordPress Theme Choosing Tips and Resources

Choosing a WordPress theme that will go good with the content of your blog and will stand the test of time is not an easy task. Sometimes it takes days for me to find that ultimate WordPress theme that I really like and has all the essential features that I want. I spend more time choosing a theme upfront even though the WordPress theme of a Blog can be changed anytime is because sometimes it can be a hassle to change the theme in the middle when I have made a lot of custom changes to the existing WordPress theme.

What to Look for When Choosing a WordPress Theme

Non Technical side of things

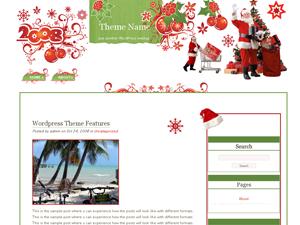
  • The first thing to pay attention to when choosing a WordPress Theme for your blog is the look and feel of the theme. Look and feel of a theme is very important. You want your visitors to feel comfortable when browsing your site. I try not to choose a theme that hurts the eye at the first look. The theme also gives your visitor an idea about your blog’s content. So try to choose a theme that’s relevant to the content. For example, if your blog is about Christmas then try to choose something like the following:
Possible Theme for a Christmas Blog
I would avoid choosing a theme like the following for the Christmas blog as it doesn’t give a Christmas expression:
Possible Bad choice of theme for a Christmas Blog
  • The second thing to look at when choosing a theme is the theme layout like how many columns it has, does it have a bottom bar? etc. The reason I think the theme layout is important is because if you are thinking about earning money from your blog later by selling ad space for example then a theme with three columns may give you more space than a two columns theme.
  • Finally, you want to look at the different pages of the theme (single post, pages, archives, categories etc) and make sure it doesn’t have any major flaws. Make sure that the body content section has the same width, the sidebar is visible etc.

Technical side of things to look for in a theme

  • Make sure the theme has valid code by default. Run your website through a Markup Validation service like W3C with a default setup of the theme. You don’t want to start with a WordPress theme that has coding error in the default setup.
  • Make sure that the WordPress theme you are choosing supports latest WordPress features like Widgets, Tags etc.
Remember, even though most of these theme related flaws are changeable but you may end up spending a lot time fixing it when you can save all those valuable time just by choosing a theme that already has the things you want by default.

Where to Find Your WordPress Theme

When looking for a WordPress theme, the first place to go to is the Official WordPress Theme Directory (There are thousands of themes to choose from)
Below is a list of some websites with some nice themes that I have discovered so far:
And of-course there are many others that I haven’t discovered yet… Feel free to leave any WordPress theme related suggestions in the comment area below.